Showing posts with label layer cake. Show all posts

August 14, 2010

*star sampler* block 9

Block 9 is here! 

Here is what you will need:

From your SOLID (mine is brown):
  • 8 - 2 1/2" squares
  • 8 - 2 7/8" squares
  • 2 - 3 1/4" squares
From PRINT 1 (mine is lime green fleur de lis):
  • 4 - 2 7/8" squares cut diagonally to make 8 triangles
  • 4 - 2 7/8" squares NOT cut diagonally
From PRINT 2 (mine is a combo of 3 prints, hot pink, pink feathers and lime green floral print)
  • 4 - 2 7/8" squares (mine are the hot pink)
  • 2 - 3 1/4" squares (mine are the pink feathers)
  • 4 - 2 1/2" squares (mine are the lime green floral print) 

 
Now, start by marking a diagonal line on the back of all 8 of your solid 2 7/8" squares.  I don't have a photo of this since my line wasn't very noticeable on the back of my brown. 

Pair one solid 2 7/8" square with the 2 7/8" squares from Print 1 and Print 2.  Stitch a SCANT 1/4" seam on each side of the diagonal line. 
It's very important that this is a SCANT seam!!!  Each square in this block should measure 2 1/2", you can always trim them down if they're slightly too big, better too big than too small!

Now trim each of those blocks on the drawn line and press your HSTs open.

Now, repeat the above 2 steps with your 3 1/4" squares.

Next take the blocks you made with your 3 1/4" squares and cut them in half diagonally like this, do this to all the triangles so it will yield 8 total solid/print triangles:

Take your 8 triangles of Print 1 and pair it with the above pieces.
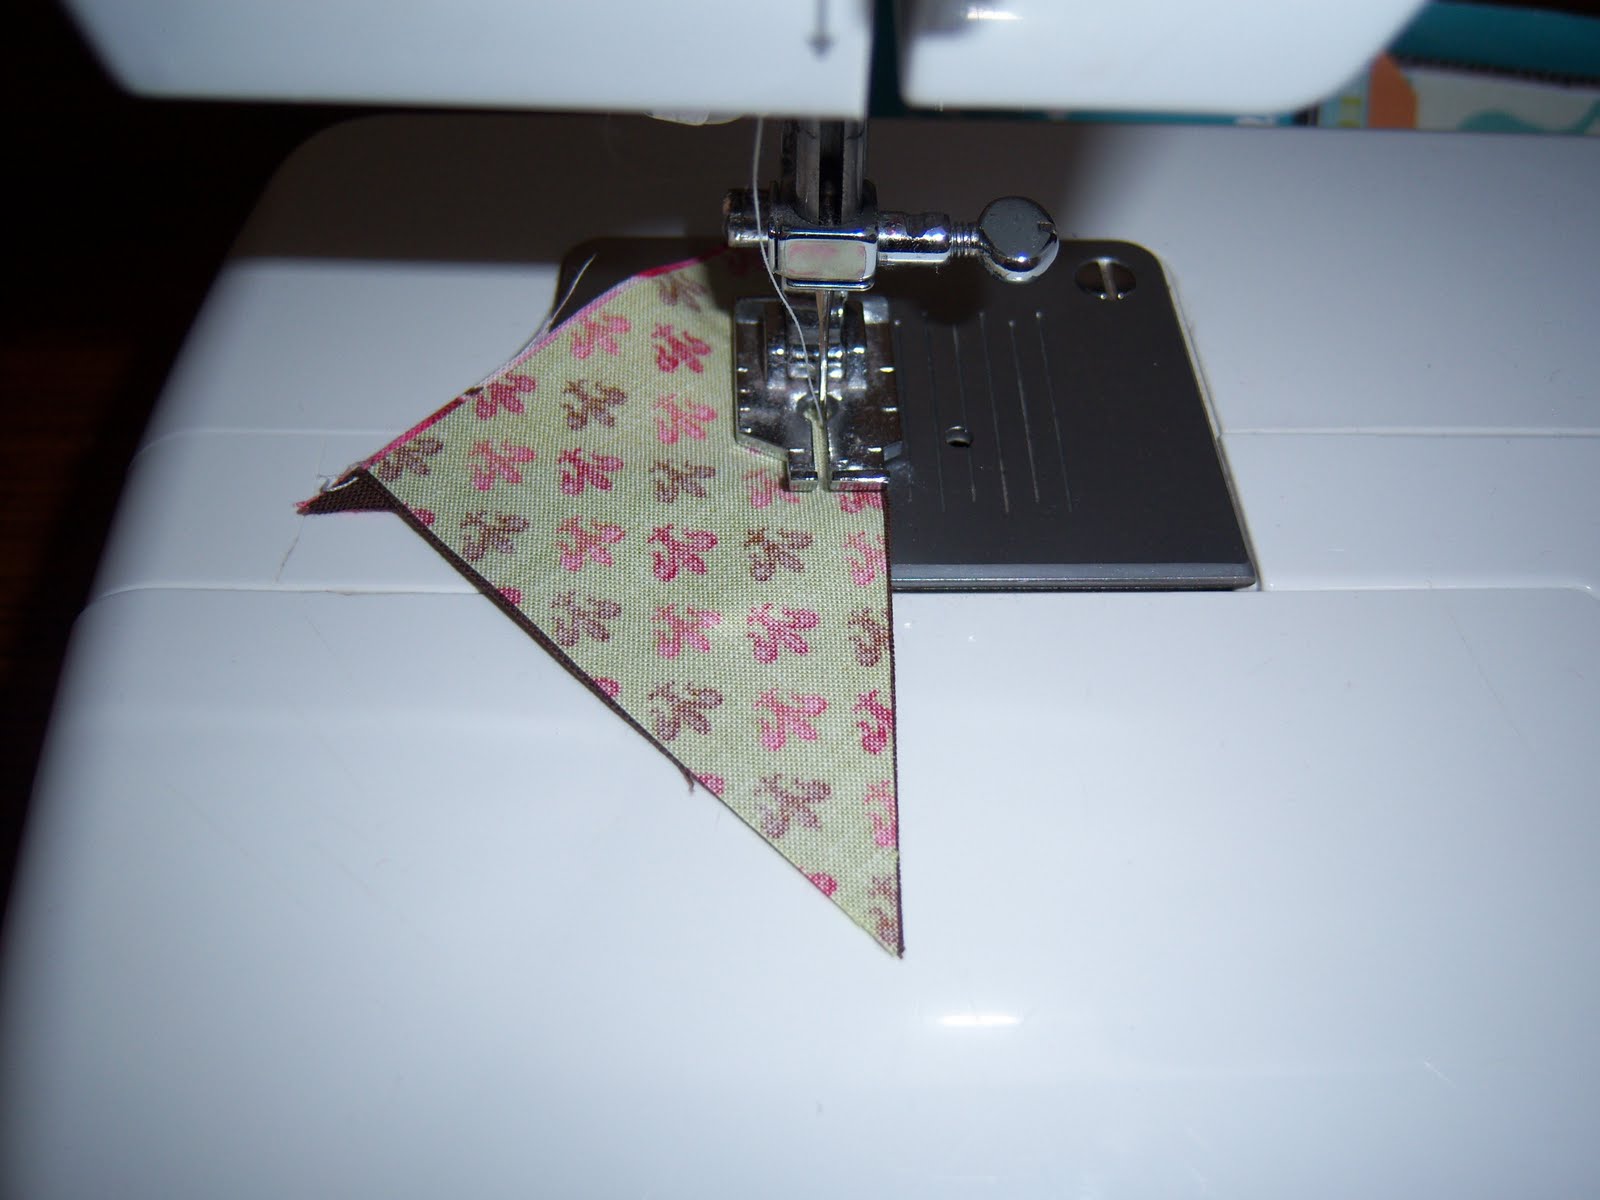
These blocks should resemble something like this:

Now lay out your entire block so it looks like this, your center pieces are the 2 1/2 inch squares from your Print 2!:
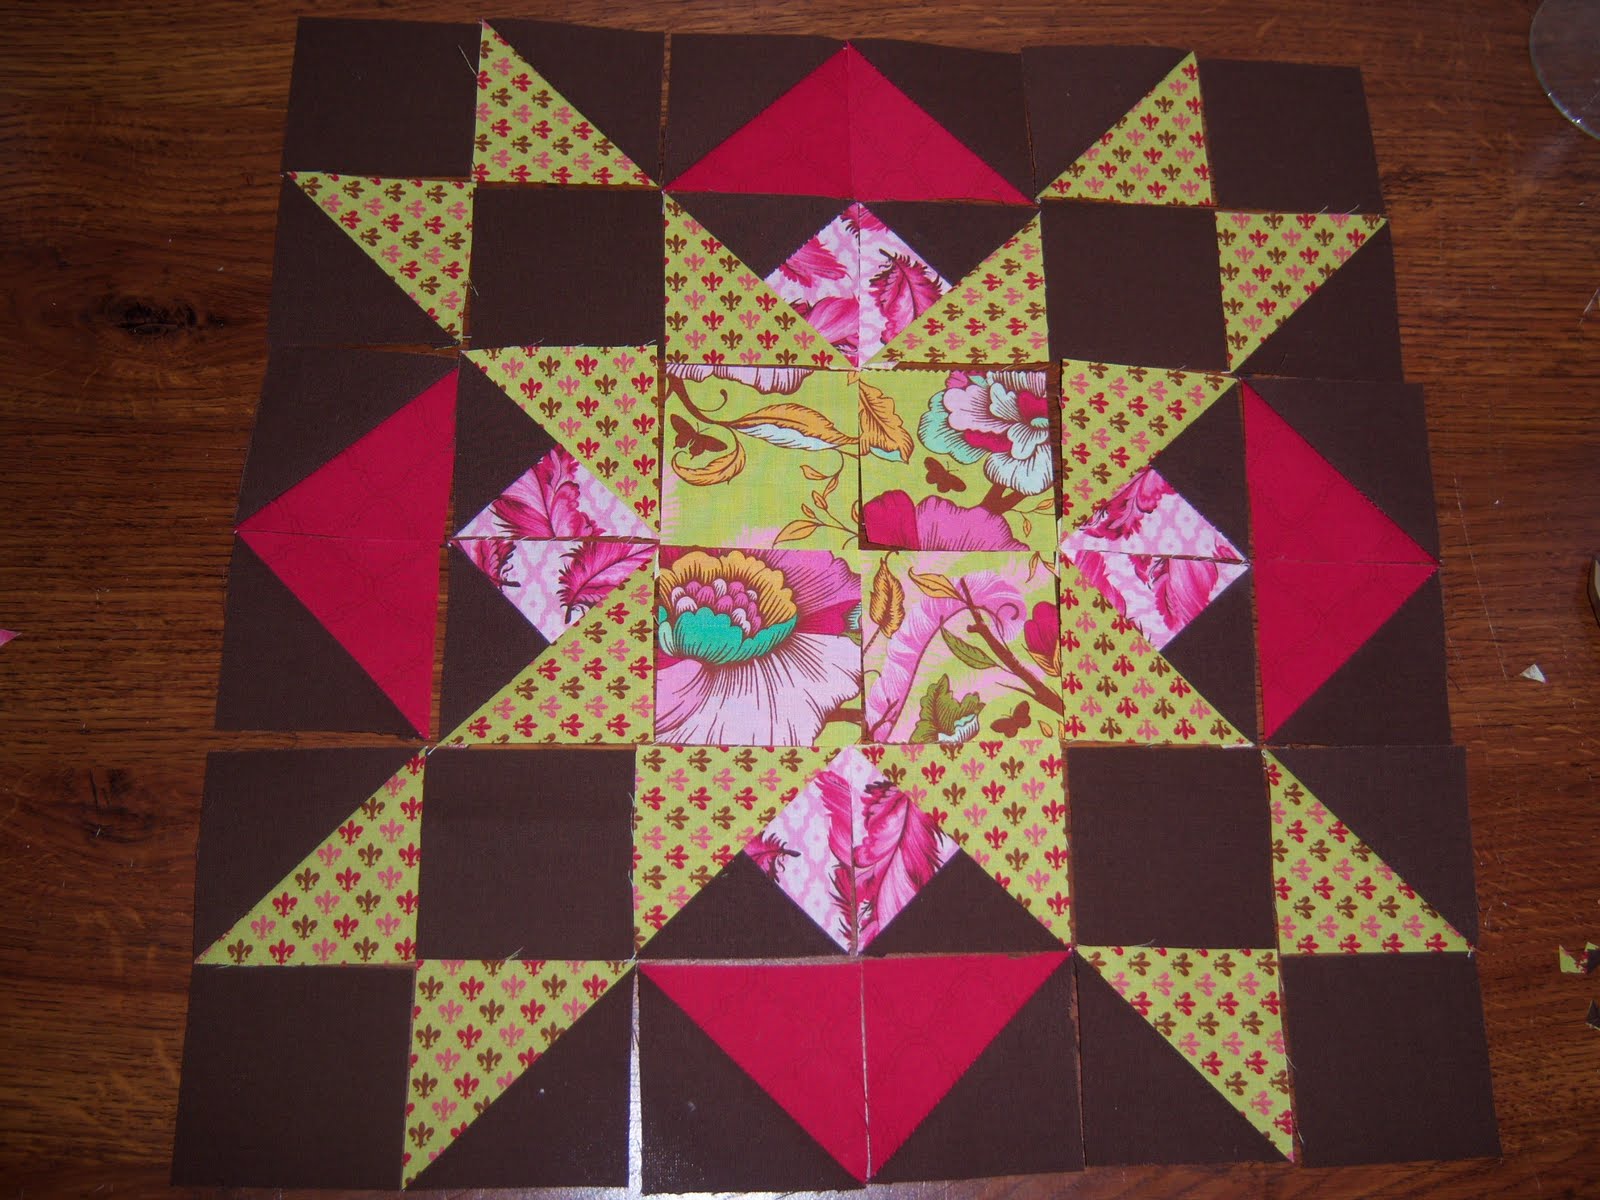
Note: each of row has 6 - 2 1/2" squares and there are 6 rows.  You should have 36 pieces total.


(pssst....mine isn't sewn together yet!  i laid it out on my desk right where my sewing machine goes to take the pic, and whoops I was too freakin' lazy to move them all to sew them!)

July 17, 2010

*star sampler* block 7

This week's block is very easy and a little bit different than the traditional style flying geese star block.
 
From your SOLID (mine is brown)
4 - 3 1/2 inch squares**
4 - 3 1/2 x 6 1/2 inch rectangles

From PRINT 1 (mine is the green)
1 - 6 1/2 inch square
 
From PRINT 2 (mine is the hot pink)
8 - 3 1/2 inch squares *this is a duplicate layer cake sq)
 
From PRINT 3 (mine is the white fleur de lis & yellow)
4 - 3 1/2 inch squares (I did 2 of each & used scraps)
 
From PRINT 4 (mine is aqua fleur de lis in the photo)
4 - 3 1/2 inch squares**
 
**- you only need ONE set of these fabrics, these are the corners, if you scroll down further you can find the different layouts, I chose to go w/ my solid over the aqua fleur de lis.


Start by drawing a diagonal line on the back of each of your PRINT 3.  


Take your PRINT 1 and start by taking one of your PRINT 3 and attach it to the corner of PRINT 1.


Sew on your drawn line, then trim 1/4" away from your sewn line.  Press your seam however you choose.


You need to repeat that for each of the 4 corners.  This is what your center piece should look like:


Now we're going to make the flying geese units.  Take your PRINT 2 and draw a diagonal line on the back of each square.  (let's pretend I have a photo :p)

Take a square of PRINT 2 and place it on top of your SOLID rectangle so the drawn line goes from top center to bottom corner.  Stitch on your sewn line, do this 4 times.


Now whack off the excess by cutting 1/4" away from your seam.  Do this to all four pieces then press.


Now lather, rinse, repeat to the other side.
 
Here comes the color options for the corners.  I chose the solid in my final block but here were the options.


I didn't care for the print.  If you want to save a layer cake square use your solid.  There is enough detail in the center block that you don't need the print in the corners.  

This is my final block!


June 26, 2010

*star sampler* block 5


Here it is! Better late than never :p This one is super simple and cute to boot! For this block you will need:
From your solid:
  • 1 - 4 7/8" x 9 3/4" rectangle
  • 5 - 4 1/2" squares
From Print 1 (mine is pink):

  • 1 - 4 7/8" x 9 3/4" rectangle
From Print 2 (mine is green):

  • 8 - 2 1/2" squares 


Start by taking your solid rectangle and draw a vertical line at 4 7/8" that divides the rectangle into 2 squares. 


Next, draw lines from the lower corner to the vertical line, this will make 4 triangles.  I know you're thinking WTH is this all about!?  Well, just trust me, you won't find this anymore difficult.


Pair this piece up with your print 1 rectangle, right sides together.  DO NOT SEW on the vertical line.  Just sew 1/4" on either side of the diagonal lines, when you're done press it and set aside.


Now, draw a diagonal line from corner to corner on each square of print #2.  


Take 1 solid square and one print #2 square.  Place it on the fabric so the ends of the line goes from center to center on the solid.  Sew on this line.


Then, measure 1/4" from your sewn line and trim.  Press to the dark side.  


Repeat the previous 2 steps on the other side.  Make 3 more of these for a total of 4.


Now we'll cut apart the rectangle.  Start by cutting ON the vertical line.


Then the on the diagonal lines.


Press your seams to the dark side.  

Arrange in the following manner:


Your final block should look like this!


June 20, 2010

*star sampler* block 4

Here's block 4, a classic Ohio star with a modern twist!

You will need:
From your solid:
  • 4 - 4 1/2 inch squares
  • 2 - 5 1/4 inch squares each cut twice diagonally to get 8 triangles
From your print 1 (mine is yellow):
  • 1 - 4 1/2 inch square  
From your print 2 (mine is pink):
  • 1 - 5 1/4 inch square cut twice diagonally to get 4 triangles   
From your print 3 (mine is green):
  • 1 - 5 1/4 inch square cut twice diagonally to get 4 triangles  

 Start by sewing each print triangle to a piece of your solid.

Once you have completed those press all seams to the darker side.  Next you are going to join 2 of those larger triangles from the above step.

They should look like hour glasses when they're done, the above obviously aren't sewn but that's the look you're going for.

Do this for all your larger triangles, you should have 4 hourglass blocks total.

Now, layout your block like so:
It really helps if you press your seams to the non-pieced squares, your seams won't be as bulky and they'll nest nicely when you're done.

This is what your finished block should resemble:

There is your finished super easy peasy lemon squeezy Ohio star block!

If you're looking for other blocks you can find them at the links below:
*star sampler* block 1
*star sampler* block 2
*star sampler* block 3

June 8, 2010

2 new tops

Well, 3 really. I can't show you one just yet. Yes, yes, I know it's no fun but trust me, you'll like it! The 2 I can show you are these:


They're both made of a hushabye layer cake and the snowballed with 3 inch squares in the corners of Kona bone. I made these for my daughter's 1st grade teacher who is expecting twin girls any day now. Just need to find a suitable backing color and I'll stipple them and send them off!

June 5, 2010

*star sampler* block 1

It's here! The first block and it's super easy! I'm gonna give you a little hint with these, STARCH!!! You will have a bunch of bias edges in this block and it will make your life just a smidge easier and your triangles a little less distorted. All seams are 1/4" and your block should measure 12 1/2" square.


What you will need:
Solid:
  • 4 - 4 1/2 inch squares

  • 1 - 5 1/4 inch square cut twice diagonally

  • Print 1 (mine is fleur de lis):
  • 2 - 4 7/8 inch squares cut ONCE diagonally

  • Print 2 (mine is the dark color):
  • 1 - 4 1/2 inch square

  • 1 - 5 1/4 inch square cut TWICE diagonally


  • You're going to start by sewing your triangles from the 2nd print to your solid triangles. Make 4 of these. Press your seams toward the darker side or open if you prefer.


    Next, you're going to add the pieces from the above step to the triangles from your first print. Make 4 of these. Press seam toward the print you just added or open.


    Now arrange your block like so:


    Stitch your rows up and press your seams toward the solid square on each row, this will make them nest nicely when you sew them. You can also press them open if you prefer. Your finished block will look like this:


    Since all 16 blocks are going to be different you only need to make one! Block 2 will need a duplicate print, just so you're aware. I would save your favorite prints for block #3, it's pure awesome and would look awesome with all prints, you will need 2 duplicate squares for this block if you choose to do all prints, if not, just one duplicate will be needed!


    April 30, 2010

    pinwheel unveiled & figgy pudding


    That's my pinwheel!!! Mine is measuring about 57" square, I can't wait to see it completely finished! Of course, fabrics are Verna by Kate Spain for Moda. When I took my mom to the airport a couple weeks ago she stopped at my house and I showed her the individual blocks and she fell in love with them. I decided to give this to her for Mother's Day this year. She doesn't know of this blog so my secret is safe :)


    This is the quilt I eluded to in my pattern review post. It's all Figgy Pudding and I can't wait to get it finished!! I'm going to use the green damask on the back and quilt it with red thread I think. Now, if I can find the pattern I had in mind for my Plume quilt then I can start cutting and get going on that beast, I'm going King size on that one!

    Happy Quilting!!

    March 10, 2010

    more blocks!

    2 more blocks for the pinwheel quilt along done!! Before my gramma died i was trying to figure out what to do with this quilt. I debated on keeping it, giving it away, selling it, then I decided that I was going to give it to her because she was always cold and it will end up being a perfect lap size for her. Obviously now I can't give it to her but I am going to keep it but name it Grandma's Garden. She was so proud of her flowers and since Verna has a lot of floral prints it's perfect!


    And Julie, over at Jaybird Quilts asked how you store your wip's. Well, this is my way! The large containers are under $3 at Walmart and the shoeboxes are about $1 each. I keep all the fabric for the quilt in the box, as well as the pattern. I put a label on the box, start date, and the name of the fabric. I will also put any other things specifically for that quilt in there like thread color if it's specific.


    and yes the kona has been found!!! it was in a laundry basket of clean clothes under a blanket. yea, i'm still trying to figure that one out.
    Related Posts Plugin for WordPress, Blogger...