November 21, 2013

Product love, Erin Condren style and with a $10 coupon!!

I've had my Erin Condren Life Planner for a couple months now and let me tell you, that baby is a life saver!  I don't feel as scatter brained anymore and if I need something I can refer back to when it happened very easily.  I use mine to keep track if my work schedule, my fiances drill schedule, my kids school activities and days off, my personal appointments, and I track my calls from work in there too (we get a call bonus so I keep track of the number of calls I run in a shift).  

Since ordering my Life Planner I have also ordered a notebook with a monthly calendar added in for my Girl Scout troop.  It'll keep track of all of our activities, financials, and badge work activities.  I'm so excited to get that, I will definitely do an unboxing and review when I get it.  

I'm also contemplating getting a notebook, no calendar, just for me.  I'm a sucker for a pretty notebook! Not sure what exactly I would use it for but the possibilities are endless.  

That's my lifeline right there, I've shared that picture before but it's just so pretty I can't help but share it again! I didn't customize the colors on this one but I did on my Girl Scout notebook.  If you're contemplating getting one of these beauties but the cost is a turn off for you I have a $10 coupon code that you can get! 

Simply sign up for an account using this Referral Link.  You will get a $10 code sent to you practically immediately! The email you use must not already have been used to sign up for an account on ErinCondren.com.  Just act quickly! That $10 code expires in 30 days!! Also, if you place a small order with that $10 coupon code you can come back and use gift20 to get $20 off a second order!  Right now they have luggage and lunch boxes 25% off! Can you imagine the Christmas possibilities?! 


Disclaimer: that referral link will also earn me a $10 gift certificate ONLY if you purchase something!  Once you place an order you can share your referral code in your circle of friends, on the web, and wherever earning YOU endless $10 credit!

October 23, 2013

Getting Back into Cross Stitching

Many years ago my mom cross stitched me a stocking and I've been looking for years for something for our entire family but never came across anything that I liked enough to spend the money on.  So I decided to cross stitch my kids each a stocking.  The patterns came from Cross Stitch and Country Crafts circa 80s and 90s.  I bought the magazines with the patterns in them from eBay and finally got started on my sons.  His is the least labor intensive so I figured I'd knock that one out quick.  

Here is what it's looking like so far!

I have a lot more of the little details filled in but the scene for this stocking is a tool shop.  This is only part of the stocking but appears to be the area with the most thread color changes and teeny tiny details.  

I also created a little pattern.  It has NOTHING to do with this stocking or even Christmas.  I just saw a pic and thought it would be funny to duplicate in stitching.  


You can download the chart here:  i own you pattern

This download is hosted on scribd so it's a nice easy way to acquire this adorable coffee mug.  I can't wait to see what you make!  You could easily change the mug color too!


September 25, 2013

Erin Condren Life Planner Review

I finally got my planner!  So far I love it, I'm still trying to figure out exactly how I want to use it.  What I love about this planner:

  • Size, fits perfectly in my purse
  • Lots of room to write (at least for me)
  • You have a monthly calendar view followed by the weekly spreads
  • Each day of the weekly spread is broken up into morning, day, and evening
  • Lots of stickers included! Doctor's appts, game day, mani/pedi, day off, birthday, etc and a bunch of blank ones to put whatever you want. 
  • Clear zippered pocket in the back to hold things.
  • Tabs are laminated!  I can see how in years past this was an issue when they weren't laminated.  They're very sturdy as they are now.  
This is the perpetual calendar.  I've put in some birthdays but I've seen others who have used it as a workout log, a financial log, etc.  They just use washi tape over the birthdays and anniversaries, I don't see this being a huge use to me.


This is the 2013/2014 at a glance.  This is super useful if you just want to see where a particular date falls in the year without having to flip to the actual month.  All the months have the same color schemes so once you figure out what they are you can easily dart your eyes to that month.  All of the color combos rock.


This is what a monthly spread looks like.  The blue washi tape shows when my kids are with their dad and the black washi is the weekend my fiance has his Army Reserve duty.  I also put when my car payment and my car insurance payments are due on this calendar.  My paydays are also written in so I know what to expect and when.  Nothing is on auto pay so it's my visual reminder. 


This is the weekly spread.  The week runs from Monday-Sunday during the weekly spreads.  Also, if a month changes during the week it will change to the corresponding colors for that month.  As you can see here, this is an Army weekend!  I chose not to put when the kids are with their dad here just because the monthly thing is a reminder, especially if something comes up and I need to know where they're going to be so I can schedule appropriately.  I also use these spaces to write down the run numbers of any ventilator transport I have as those are extra money.


 These are the notes pages.  There are a bunch of lined pages and a handful of blank ones.  The lined ones just have her little asterisk in the lower corner opposite the binding and LOTS of room to write!


These are the blank pages.  These have some of her designs on the top, this one is the fleur feliz pattern.  Others are gingham, candy lace, plaid, and zig zag.


This is the contact section, lots of places to write lots of numbers.  I use Postable for all my permanent addresses I keep track of, this I'm using for school contacts for my kids and such.  I don't see myself using this too much but it's nice to have to jot down an address in a pinch.


 This is the keep it together folder, it's double sided and fairly deep.  I have a couple things stashed in here now and I can definitely see getting some use out of this!
 The other side of the keep it together folder and the plastic zippered pouch.  I keep all the stickers that came with the planner in here.  I tore them out and cut them into their colored sections with my paper trimmer.
This is the inside of the back cover.  It's the years 2015 and 2016 at a glance.  I like knowing what days of the week birthdays fall on, or holidays so I have an idea of what we might be doing.  No, I don't plan that far in advance but it's nice to know if something falls during the week or weekend.


The coiling on the planner is super sturdy.  It's very hard to pinch two of them together so I can imagine this is going to take lots of abuse and still look darn good!  There are a couple things I'm not thrilled about already, one of my notes pages came scuffed, not a big deal but it's the tabbed page, otherwise I'd just pull it out and use it for something else.  There's a small tear in the bottom of the folder on the pink side, it's from where the ruler/bookmark was tucked into the pocket, maybe to avoid this they can snap the bookmark inside the front cover or put it with the info they put in the box.  Also, the cover scratches super easy.  The back of my planner already has some rough spots where it's been scratched up already.  They did offer for me to send my planner back but I opted not to because I've already started using it.  I just let them know because the quality of the laminate is not worthy of a $50 planner.

They also include a boat load of free labels.  You get 23 of them with your planner, which, if you were to purchase on her site is a $25 value.  I also got 2 codes worth $10 each as well.

Over all, I'm happy, I love my planner, not sure if I'll be buying another one next year but we'll see, $50 is a LOT of money for us right now.  If you want to check out a video I did head over here to you tube!


Disclaimer--I was not compensated in any way for this review, this is just such a hot item that I figured I'd write up my own opinions on this product.  

September 1, 2013

Erin Condren here I come!

So, I finally gave into the fact that I can't hold everything in my brain and I fail miserably at keeping an electronic calendar.  I've been reading great things about the Erin Condren Life Planners and how they just keep getting better.  I tried and tried to find something similar for cheaper but nothing was large enough or set up in the way that I want.  More often than not they're loaded with crap I'd never use, I really don't need a world time zone map, nor do I need formulas to find areas or circumferences, or metric to imperial conversions, or a place to write my class schedule, or a giant block for the day.  

I found a planner online that was similar, The Everything Planner by Gennifer Bursett, then I tried to create my own with just what I needed/wanted.  Well, when all was said and done I ended up wasting a crap load of time because when I went to upload my own planner to get it printed it would be MORE than buying an Erin Condren Life Planner.  It wouldn't be nearly as pretty as the Erin.  

I am happy to say that I have this baby on the way to me!
Obviously, mine will have my info on it but that's the cover I chose.  You can also choose your own colors if you choose.  You can choose a multitude of options to include with your Life Planner as well.  I just chose a 12 mo calendar but you can choose an 18 if that's your speed.  I prefer an academic calendar vs a straight yearly.  Also, you can get stickers, pens, pen holders, elastic bands, etc.  

I cannot wait for mine to arrive, it does take a few weeks to produce and ship, waiting is hard!  Mine is expected to ship on 9/13.  They also have teacher planners and I'm considering getting one for my sister when she graduates from school as a grad gift.  Yes, they are pricey, but having what I needed and wanted was worth it rather than buying 3 or 4 $10-15 planners and not being happy.  I stalked blogs and such for reviews for a few weeks before I bought one.

In other news, I still haven't pulled out my sewing machine since we moved.  Lacking a table that I can comfortably sit at is a big reason why.  I have a very small space for a dining room table and haven't found the perfect one yet.  I did bring home an IKEA catalog yesterday so maybe I'll be able to find something there, wasn't really able to find one yesterday when we went.  

Hoping to find some sewing mojo soon!

July 27, 2013

Project Life Storage

Since I've been bitten by the Project Life bug I've acquired 3 core kits, a couple themed cards by MAMBI, and some assorted page protectors.  I don't keep all of the core kits, depending on the kit I keep about 1/2 the kit so the boxes they came in were just too big for what was in them.  Plus having 3 of them made shuffling the boxes a little tricky.  I've been scouring pinterest looking for a solution and none of them were both cost effective and realistic for me.  Today while I was at Michael's I found this:


It's the extra large photo keeper from IRIS.  Michael's had their storage on sale this past week for 50% off so it was only $20.  There are 16 4x6x1 inch boxes in the carrying case.  I was able to consolidate all my cards into 6 of the small boxes with room to spare for all the new Project Life goodies that were just released last week.  I will never buy any Project Life products without a coupon.  


The top row holds all my Honey cards, the middle row holds my Midnight cards and my MAMBI cards, and the bottom row holds all of my Blush cards.  

My favorite part about this storage is that it's portable, easy to store in a closet, and if I can buy another set of these boxes if need be.  

Getting started with Project Life can be a bit expensive, however, you can use coupons at Michael's and Hobby Lobby for all Project Life branded products. 

July 13, 2013

Lots of good things!

Has it really been over a month since I posted?  Seems like just yesterday!  Well, LOTS of things have happened in this past month, some good, some bad, and some fantastic.  

I'll just get the bad out of the way.  Someone hit my fiances car in the parking lot of our apartment then took off.  Then the motor blew up unrelated to the accident.  Then our landlord went insanely batshit crazy on us, but that takes us to the good.

We got a new apartment!  Since our landlord went off the deep end we figured it would be better to cut our losses there and move.  We were able to negotiate an early end to our lease and found a much better place to live.  We have a washer and dryer so no more schlepping to the laundromat, which ROCKS.  I'm so stupidly excited about that it's not even funny.  We also have a garage which I'm sure I will come to love in the winter.

And saving the best for last, the most fantastic news ever...


These two sweet adorable little ones have come home where they belong.  I'm loving life right now.  I've only mentioned it a couple times here on my blog but they're coming home.  August 9 to be exact.  Welcome home kiddos!

June 9, 2013

Project Life

I jumped on the Project Life bandwagon!  I've always liked the concept, however, not being to actually see the physical product for the cost of it, I never partook.  Now that Hobby Lobby and Archivers, and soon to be Michael's, are carrying it I decided to give it a go.  You can also use coupons on them which makes it even better!  I'm really enjoying the Blush edition.  I also have Midnight and I'm not loving it.  The only thing I dislike is not being able to see everything in the kit.  


I must say, this is a super easy way of keeping everything simple and quick.  So far, I love it!

April 28, 2013

It may have been a month, but I have *HUGE* news!

I'm getting married!!!  

My boyfriend proposed on Friday morning!  We spent all of the weekend celebrating and just being together, we went for a bike ride, cleared out some junk, went to dinner with my future in-laws, drove around aimlessly through Wisconsin, ate dinner in Lake Geneva, and just enjoyed every moment of this amazing weekend.  I'm guessing you want to see the ring, huh?


He did an amazing job and it just sparkles endlessly!  I can't stop looking at it and just being so enamored by it.  

I'll try to keep this blog quilty related but can't promise a I'll get away from the wedding posts ;)

March 18, 2013

Heading to bloglovin'!

By now we all know that Google Reader will be no longer come July 1.  Why they would get rid of it is beyond me.  I have been looking at other reader options and Bloglovin is simple and user friendly, just like Google Reader.

So, you can find me over here at Follow on Bloglovin

March 17, 2013

Do you Shopkick?

Since joining the iPhone world I've discovered a wonderful app called Shopkick.  Basically you earn points for shopping, browsing through the app, and walking into stores.  With those points that you earn you can get gift cards for various places like Starbucks, Best Buy, Target, iTunes, Old Navy, Macy's, Sephora, & Lowe's to name a few.  You can also get gift cards for Tiffany's and Coach!  

Some of the ways to earn kicks (points):
  • Just by visiting the app each day (1 kick)
  • Browsing through the look books and opening the surprises (can vary from a bonus board piece to kicks)
  • Walking into stores (Varies but usually over 50 kicks)
  • Scanning items in the stores
  • Purchasing a certain dollar amount with a linked VISA or MasterCard.
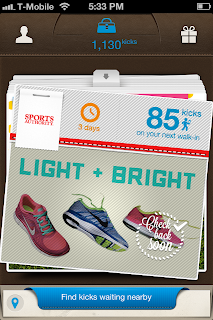
You can see in the above photo at the bottom "Find kicks waiting nearby", you click on that it will find your location and give you places to get kicks in the area, excellent if you're in an unfamiliar place!

I've only been using this app for 5 days and already have 1130 kicks, they add up quickly!  I haven't used the linked card method yet but you can get some sweet deals, works out to way more than $1 per point if you meet certain limits.  As you can see Toys R Us gives you 2 kicks for ever $1 spent PLUS more kicks if you spend over a certain amount.  Best Buy is 1 kick per dollar and 350 bonus kicks for $75 spent, 800 for $150 spent, and 1250 for $200 spent.  This is in addition to any points you may earn with their Reward Zone card!  Wish I had this when I bought my iPad!

The 85 kicks you see in the upper right hand corner are the walk-in kicks I unlocked just by browsing the look books available for Toys R Us.  Next time I walk in to TRU I pull up the app and it will give me my 85 kicks.  Some of them have expiration dates but usually are within a week, others are just a few days.  I also have received 160 kicks in the last 2 days just from walking into Target, so that one resets every day.  


Clicking on the heart on the bottom right will bring up any in-store scans that may be available.  All you have to do is tap on the item to be scanned and it will bring up the camera, it will 'scan' the barcode and you will get the number of kicks it says for that item.  These are some of the kicks I have available to me for my nearest Walmart.  I'm not sure if others are different.  If I scan every item in my list I have a potential to get 105 kicks.  

Sometimes you will get 'scavenger hunt' type scans.  Today at Target for example, there are Easter scans.  There are 3 items listed that you can scan, after scanning all 3 items I got a 50 kick bonus.  I think each scan was worth 10 points.  

A word of caution, not all items will be available at each store for scanning.  For example, I had those Oreos you see to the left available to scan at Walgreen's but my local Walgreen's didn't carry them. 


Here is the Bonus Board.  Most of these are found by opening the surprises within the look books but as you can see there are some that you can scan and earn points for.  There is an error on mine, it shows the Target one as being un-scanned but the Pantene one as scanned, but when you click on it it's correct.  You can collect multiple bonuses for each time you complete the grouping.  I've completed the Crystal Light bonus 2x already and working on a 3rd time as you can see.  

So far I really love this app, it's SO much fun!  I went to Target today with the kids and they really had fun looking for the products to scan.  They truly couldn't get enough of it.  

The only thing that will delay your kicks are purchases with the linked cards.  Debit cards cannot be used because they can't be tracked from VISA and MasterCard.  Those kicks are also 'banked' until the return period has passed, when that happens it will release your kicks.  

So do you Shopkick??

**DISCLAIMER** I'm not in any way compensated for this app review, I just happen to love it!.  The app is free in the Apple App Store and in Google Play.  It's not compatible with all devices, my old phone (T-Mobile Prism) was not compatible and was not compatible with my wi-fi only iPad, not sure if it's compatible with the 3G iPads.  Also, clicking the above links will send you to my referral site and I will earn kicks for you signing up.  You can do the same for recruiting your friends and family!  

March 8, 2013

What happens when...

...you have a BUNCH of Vintage Modern leftovers from the Designer Mystery BOM?


Simple, you buy Vintage Holiday and start making some blocks!


So far it looks like I'll only have to buy some border fabric and backing.  I'll most likely have enough left over from the finishing kit and BOMs for the rest of the top.  The blocks go together SUPER quick and even with having to cut all the pieces I was able to crank out all 4 in a little more than an hour.  


March 1, 2013

Dust Beasts

Because bunnies is too delicate a term for what I found inside my sewing machine today.  This afternoon I took the back cover off of my machine and cleaned the heck out of it!  I have a very basic machine probably about 9 years old now so way out of warranty so do not attempt this if your machine is advance or still within warranty, doing so could cause irreversible damage and void your warranty.  

Now that the disclaimer is over here is what I found inside:

This is looking up from the bottom of the machine with it on it's face.  I blew it out with canned air and then got a swiffer duster in there to clean off some parts that wouldn't come clean with the air.  I don't recommend using canned air on an electronic machine, it could damage the components.  Since mine is so basic and I've used canned air before with no problems I didn't have concerns about doing it this time.  

There was lint so packed it took the shape of where it was packed into.  My sewing space (which doubles as my dining room) is SO dusty right now!!  

I also oiled my machine today too.  I found the easiest way to do this was with a q-tip of all things.  Now she hums along as quietly as ever.  

Remember! If you have anything more than a basic machine like mine don't attempt to take it apart and clean it!  You could do expensive damage to it that would make anyone sob.  Even if you have a basic machine tread carefully.  I didn't mess with any internal workings, the only screws I took off were ones that held the housing on.

February 24, 2013

Second top finish of 2013!

I finished this quilt top today!  My second for 2013, this is a really fun quilt and pretty large for just using one charm pack.  A while back I won a charm pack of Joy from Kate Spain and I must say, it's a gorgeous line! I found some Flurry FQs at a LQS on sale that I was planning on using for the borders but instead decided to use my binding fabric for the borders.  It turned out to be the perfect choice!  Those zig zags really make the quilt complete.  

One thing I'm not pleased about is the inconsistency in the color of the Moda Bella white.  It's not one consistent shade of white.  But hopefully using a white batting will help even things out.  It's actually not as bad as the picture portrays, that's more of a shadow from my boyfriend who is holding it.  He's 5'7" so it's a good sized quilt, perfect for curling up with it and a good book on the couch.  


February 17, 2013

Bridget's Bagettes by Atkinson Designs--a pattern review

I found this pattern at my LQS about 6 mos ago now.  I tucked it away and forgot all about it until I needed wanted to make a pencil case.  Of course I totally forgot where I stashed it so it took me about 20 mins to find it.  Then it took me another 10 to figure out what I did with the huge remnant of vinyl I bought eons ago.  


Once I located all the materials I got started.  I didn't have fusible fleece but I did have a lightweight fusible interfacing which worked just fine, in fact, I think the fleece might be overkill for this project.  

I will say that if you rely on words WITH the diagrams you may be a little lost.  There were a couple steps that took me forever to figure out, whether it was because I started this at 1030 PM or because I'm incredibly dumb or I tried to make it harder than it was but I'll try to clarify the steps in question without giving away the entire pattern.  

A couple words of caution, the vinyl WILL melt if it comes into contact with the iron.  If you need to flatten your vinyl put it on your ironing board, cover it with a piece of fabric, make a couple quick, light passes then put the warmed vinyl under a ruler for it to cool and flatten out.  I've done this method a few times when using vinyl for projects.  Also, put some paper under the vinyl as you pass it through your sewing machine, you'll curse and bitch up a storm if you don't.  

Now, onto the pattern review!

Cost: $6.50
Materials: 2 Fat Quarters, 3 14" zippers, fusible fleece, lightweight fusible interfacing,  & clear vinyl.  
Special tools: Zipper foot, walking foot, tissue paper, Clover Wonder Clips (optional but HUGE help)
Notes: you can very easily get away with using a 9" zipper and two 12" zippers.  There is NO need for such excess zipper, the pattern uses the leftovers to create a zipper pull which honestly, is not needed.  

There are several diagrams but the wording can be poor at times.  There are also some extra steps that an individual experienced with zippers can easily combine.  The most confusing step comes at the very end when you're putting the backing/binding on.  The diagram shows it correctly, the wording is lacking for clear explanation of the step.  You find the centers of both the front and back, with right sides together line up your center marks and match the raw edges of the top and bottom edges.  The fabric will appear bunched in between but this is OK!  This will give you the appearance of binding on the top and bottom edges when you turn the pouch right side out.  

I did the simple corners, which really are super simple.  This is where the Wonder Clips come in handy!  They work SO well to hold the folds in place while you stitch the sides down.  

This is the finished pouch!


A couple things I might change if I make it again, I'd consider using a medium weight interfacing for stability where fusible fleece is used.  I used a lightweight fusible but the medium weight might be a better choice if you want it more rigid.  I'd also use a thicker vinyl.  I think the remnant I bought was something like 50 cents so the price was right but it might be too thin for this project. 

Once I got past my own hangups on this pattern I'd definitely make this again.  In fact, I'm hoping to go get some thicker vinyl and make a couple more!

Fabrics are Out to Sea by Sarah Jane for Michael Miller fabrics.  Very cute stuff!


February 13, 2013

Doesn't it drive you batty when...

You make a quilt from a pattern that could use some better directions?!  Not going to say which one I'm having issues with, it's a free pattern but it's missing some cuts and the yardage requirements are off by 4 inches but still, you need room to square up your edge and if you buy from a big box store you know you could be hacking off 2 inches!  Always better to round up.  The pattern I'm dealing with now also is missing 8 pieces from the cutting AND assembly instructions.  (I just checked and the correct cutting requirements are there now, they weren't when I downloaded the pattern 8 mos ago to the date).  Again, I know it's a free pattern but it's still frustrating.  And I do have enough fabric in my stash so it's not a big deal in the end.  Just maddening when you're in the middle of the project!

Then when there is no diagram to show you how to assemble the top, just really dark photos when printed off.  I was going to post a pic but noticed when I looked at it in photo form I screwed up a row!  It's so frustrating when you work on something then have to rip it apart because the directions could've been better.  

I know some will complain about directions being too wordy or picture/diagram overload but when you're dealing with all HSTs it helps to have a clear visual.  Oh, and when you update a pattern as the author did at least make a bold note about it pretty straight off so we all know there are corrections!  I've looked at the pattern online a dozen times and there are NO indications it was updated.  

Ok, rant over.

February 1, 2013

My Hero's Quilt

This quilt is actually completely designed by the love of my life.  He served 4 years active duty in the US Marine Corps and 7 years (and counting) in the Illinois Army National Guard and the Army Reserves.  He also served one tour of duty in Iraq as part of an Infantry unit.  When we first started dating and he found out I quilt he not so slyly mentioned that he would love a quilt of his own.  At first I was going to make a 'man quilt' in a manly pattern with manly fabric.  That wasn't going to fly with him.  He wanted a military themed quilt.  Now I really had my work cut out for me.  I showed him the Moda Quilt of Valor and he literally designed the rest.  He's very proud of his military career and the awards he's earned so this is what he came up with.

Now, a little explanation.  The solid red stripes just help to frame and set apart the other stripes.  So from L-R we have the USMC Blood Stripe.  It's a major honor to earn this stripe in the Corps and is worn on the outside of the pant leg on the dress blues, when this quilt is quilted I will add his ending rank (Corporal) and the Eagle Globe and Anchor.  The next stripe is all of his awards he's earned during his military career through the end of his tour in Iraq.  They are in order of highest importance to lowest importance.  And finally, the ACU stripe.  We went back and forth on this and just using the old Army dress uniform color, OD Green.  In the end he decided on the ACU because believe it or not, his unit was the very first to wear the Army Combat Uniform in Iraq, which according to my boyfriend is odd because they were a Reserve unit, new uniform issues are usually given to those in active duty.  So, that is how this quilt came about.  

If you're interested in colors, I used a LOT of Kona solids.  I couldn't tell you all the color names but I know for sure Royal, Poppy, Red, white, and I think Corn.  The stars are a Robert Kaufman print and the ACU print was actually found as a remnant at JoAnn.  I drafted all the ribbons using a free quilt pattern program called Quilt Assistant.  It can be kinda finicky when it comes to drafting something from scratch but play with it enough it'll work.  I also strongly advise if you want to do this paper piecing is a MUST!  There are some pieces of fabric that are only 1/4" wide and with 1/8" seam allowances due to how they're designed.  The paper helps keep them stable.  They're 8" x 2" finished.

Still unsure of how I'm going to quilt it, I'd love to send it out it's just not in the budget right now.  

January 27, 2013

#scrappytripalong update

Made a couple more blocks for the Scrappy Trip Along!


And here is all of them together so far!  Only 6 done but the DS blocks will be interspersed throughout the entire thing.  

January 25, 2013

Designer Mystery BOM month 8

Here is month 8!!

Yes I know I goofed up making this block, the blue print is all supposed to be going the same way but you know what?  I actually like this!  I literally did this block the night after I did a 22 hr shift at work so it represents a crazy time in my life while making this quilt.  I'm keeping it!

FQS designer mystery BOM month 8

Also cut into the finishing kit so I can start getting this bad boy put together!!  Only 4 more blocks left!

January 9, 2013

Modern Siggy Swap Blocks

When going through some of my sewing and quilting items I came across these blocks.  I have blocks from Rounds 1 & 2.  I have no desire to get these to the finished format.  If you want them all I ask is that you pay for shipping.  I will ship them via priority flat rate envelope.  Both sets will fit into one envelope so if you want them both it's the same price.

Gone!!!

January 7, 2013

First top finish of 2013

Well, at least I finished a top earlier this year than last!  My only top finish is 2012 came in July.  Now, to be completely honest, this top finish was made possible by the Mod Bento Block swap from 2 1/2 years ago.  I *FINALLY* made something with the blocks I received.  Each block was about 8 3/4" so it's only about 35" square, perfect baby size!  


Nothing spectacular but it's a quick finish.  It will probably be a gift for one of the many babies that are being born in my circle.  

January 6, 2013

#scrappytripalong

Yep, I've been bitten.  I need another project like I need a hole in my head but these are so quick and simple.  I've done two so far and I'm loving how quick and simple they are.  I know it's the "scrappy" trip along but I'm loving the block I did in DS Quilts fabrics.  I have a bunch of fabric from the Picnics & Fairgrounds collection and a few other prints of her subsequent JoAnn line.

Scrappy trip along

Scrappy trip along block

Yep absolutely LOVING the DS block!


January 2, 2013

Happy 2013!!!

Ok, where did 2012 go?!  Seems like just yesterday it was January 1, 2012.  

I wasn't originally going to a 2012 year in review but a lot has happened so I figured why not! 

January:
I tried to get myself into a UFO program and I failed.  Miserably!  I didn't complete one top on my list of UFOs, I did piece all my dresdens now they just have to be appliqued onto backing fabric.

February:
I began the Dear Jane BOM from Twiddletails.  I ended up having to cancel the fabric portion but still get the instructions.  I'm still maintaining the binder of instructions and have been collecting fabrics more to my suiting than what the kit was providing.  After seeing the same fabrics in different colors it really wasn't what I had in mind.  

March:
I bought myself a new (to me) car!!  Finally I have a reliable car that doesn't randomly die out on me.  This was a HUGE moment in my life!

April:
Was pretty much a blur, I can't remember much of what happened!

May:
Wrecked my car before I ever made the first payment.  Thankfully, it wasn't my fault but I'm still dealing with insurance companies to this day.

June: 
Moved my mom to Virginia and had a fun road trip and subsequent vacation in Virginia Beach.  Took my daughter on her first airplane and she had a blast, we had a great time just the two of us on that trip!  Also started the FQS Designer Mystery BOM.  I've managed to keep up with that one!

July:
My daughter celebrated birthday number 9!  I can't believe it.  I also went to Colorado on a solo trip to get to know my boyfriend's mom and step dad better.  I had met them briefly once before but had a blast with his family and really enjoyed all the wonderful scenery.  His sister and gram were also there.

August:
This was when my boyfriend told me he loved me.  We are still very much in love and it feels like our relationship has only gotten stronger by the day.  

September: 
Was a low key month, getting back into the swing of school starting and adjusting to that routine again.  I also found out I had been promoted at work!!  Still not sure if I love the position but with everything comes adjustment.  

October:
My sweet daughter broke her arm!  She fell roller blading and did a number on her radius and ulna.  6 weeks in a cast and now she is still in a brace.  Hopefully that'll be gone next week!

November:
My crazy son turned 5!!  My baby is all of a sudden such a big kid now.  He's such an awesome kid (when he wants to be) and such a challenge all at the same time.

December:
Turned out to be a wonderful month!  We celebrated New Years Eve at Key Lime Cove, all 5 of us.  Myself and my 2 kids, my boyfriend and his kid.  It was so much fun but so tiring!  And water?  I don't want to see it for a LONG time now!

Here's to a happy, healthy, & hopefully quilty 2013!!
Related Posts Plugin for WordPress, Blogger...